Take Control of the Lifecycle
Helix ALM is the best ALM software for application lifecycle management across the entire lifecycle.
That’s because Helix ALM has modules dedicated to:
- Requirements management (Helix RM).
- Test case management (Helix TCM).
- Issue management (Helix IM).
Together, this suite of ALM software delivers unparalleled traceability. That means you’ll know if requirements have been tested and met, if test runs have passed (or failed), and if issues have been resolved. Plus, if a requirement changes, you’ll know which test cases and issues will be impacted.
By using Helix ALM, you’ll ensure quality releases ship on time. And you’ll be able to meet compliance standards with ease.

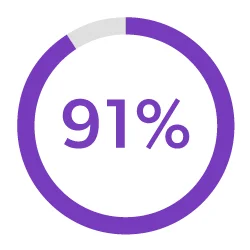
Improves alignment around requirements and changes.
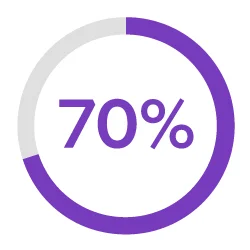
Improves the safety and/or quality of our product.
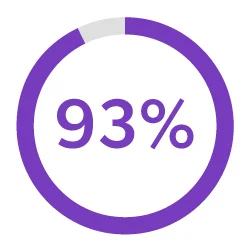
Improves traceability throughout our development process.
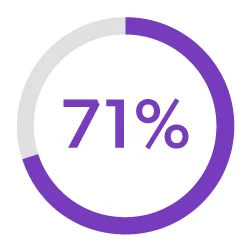
Improves our confidence in product releases.

Increases the efficiency of our team.
Brings consistency & clarity to our development process.
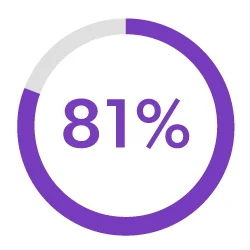
65% of customers realized a return on their Helix ALM investment within one year. 100% saw a return on their investment within two years.*
* Source: TechValidate survey of 47 users of Helix ALM, October 2022


Streamline Development
Helix ALM can handle your entire development lifecycle.
- Requirements Management
- Testing Management
- Issue Tracking
- Traceability Matrix
- Automated Workflows
- Risk Management
- Metrics & Reports
- Endless Integrations
Requirements Management
Keep everyone up-to-date on the latest requirements.
Helix ALM makes it easy to create requirements and share requirements documents. You can do requirements reviews and get approvals — all within the software. Plus, you can even reuse requirements across projects.

Testing Management
Make sure your test cases are approved and check in on the status of your test runs.
With Helix ALM, you can create test cases based on requirements. And you can generate test runs (based on those test cases). You’ll rest assured that your product has been thoroughly tested — before it hits the market.

Issue Tracking
Find and resolve bugs — before your product ships.
Tracking bugs is easy in Helix ALM. If a test run fails, the software will automatically create an issue. And you’ll be able to track that issue through to resolution. So, you’ll be confident you’re shipping the best possible product — instead of waiting in fear of customer-reported bugs.
Traceability Matrix
Prove compliance by creating a traceability matrix.
You don’t need to manually create a trace matrix in Helix ALM. The software does it for you. You’ll be able to connect requirements to test cases and issues. From there, creating a traceability matrix is a snap. You can also compare historical data with baselines. You’ll be in compliance in record time.

Automated Workflows
Be more productive with automated workflows.
Helix ALM is all you need to improve your development workflows. Simply let the workflow engine handle states, events, transitions, assignment rules, escalation rules, triggers, and more. You won’t have to manually track them.

Risk Management
Manage risk — before it impacts your bottom line.
With Helix ALM, you can create requirements based on risk. You can also do risk analysis, including FMEA and impact analyses. And you can create a traceability matrix to prove compliance — and avoid the risk of being noncompliant.

Metrics & Reports
Deliver the metrics that matter.
Your development team needs to measure progress to make sure your release is on schedule. Helix ALM’s reports give you the information you need to make timely decisions. Whether you need to know impact, burn down rates, project progress, or productivity, this ALM tool has you covered.

Integrations
Get one source of truth by integrating your ALM tool with everything else.
Helix ALM easily fits in with the rest of your toolset. It comes with out-of-the-box integrations to Jira and Helix Core, among others. It also integrates with collaboration tools, including Slack. And it offers a REST API to connect any other tool you have.


New Features: Always Shipping
Our team is always busy delivering valuable new features. Check out our What's New page for the latest in Helix ALM.
Add Traceability to Jira
Using Jira to manage tasks and track bugs? You can keep using it and integrate it with Helix ALM for greater visibility and end-to-end traceability.
